Pages

Wednesday, August 31, 2011

WMSC#62-Sewing Box Christmas

I guess I have officially started the holiday season as I brought out my holiday stamp equipment along with my great big box of paper, stamps and punches.  Today I made a tag for Waltzingmouse Stamps Sketch Challenge #62 which is a tag.  Yesterday, I made a card with a tag on it.  Today, I made a tag all by itself.  First, here is the sketch by Anya Schreier:
Here is my tag:

For this card I decided to use Sewing Box Christmas.  

Sewing Box Christmas

So many images to choose from, but for this one, the holly image won out.  I stamped it on some patterned paper by DCWV called the Christmas Combo, all left over from last Christmas.  I stamped the holly twice and cut the layers out and popped them up with dimensionals.  The holly berries are also a little circular image from Sewing Box Christmas stamped on more of the Christmas Combo Paper.  The striped holly layer, big surprise, Christmas Combo Paper too.  I zig zag stitched around the edges and layered another identical white tag to the back to hide the stitching.  I cut a few little banners to stamp my sentiment on and attached them with little mini clothespins dyed with food coloring.  The final touch was a little bow tied with my bow easy.  I love this tag and will have to think long and hard whose present to attach it to.  Thanks for taking a look at my first little bit of Holiday spirit for the 2011 season.

Monday, August 29, 2011

WMSC#62:Sewing Box Hugs

I am so excited to share this card today.  I received a little advice from my very sweet and talented friend, Renee who makes beautiful cards with Waltzingmouse stamps.  She has been Top Mouse 3 times so far and the Big Cheese once or maybe even twice (I've lost count, it's so often!).  I had asked Renee to honestly tell me how to make my cards better.  I wanted her to be brutal, and not to worry about hurting my feelings.  Her advice was to SLOW DOWN, take my time as I design and create a card.  She advised me to think, think and think some more.  She ran me through her design process and I was determined to give her suggestions a try.  The result is this card.   I thought about it all day Sat. and I chose the stamp set I wanted to use.  That was as far as I got on the first day.  The second day, I chose the patterned papers and roughly laid out the card the way I pictured it in my mind.  Today, I finished assembling the card.  Three days is a long time for me to work on a card.  I have to admit I really enjoyed the "process" so much more.  I ended up changing the card around several times, altered the card shape, changed the color of the doily and even had some help from my son and his wife choosing the ribbon and button color.  I had fun making this card.  This is one I am really proud of and can not wait to send it to the recipient.  So, now that I have told you this very long story, here is the card I made using the Waltzingmouse Sketch #62 designed by Anya Schrier.


I made a card with a tag using Waltzingmouse Stamps Sewing Box Hugs.  
Sewing Box Hugs

This is a large card, 5 1/2" square.  Much bigger than my usual cards, but with an extra large tag, it just had to be big.  I chose some patterned papers by My Minds Eye (Home, Glitter). and smokey shadow and rustic cream cardstock for the tag.  I impressed the cream tag with a woodgrain impression plate for texture.  I die cut a doily and sponged it with tea dye for a little aging.  The main images from Sewing Box Hugs were stamped onto some gingham paper I made using aqua mist ink.  This stamp set looks SO GREAT stamped on gingham.  I cut three double ended banners for the little sentiments and added a few flowers, also from Sewing Box Hugs.  For a little frill, I added some lace and pearls to the tag as well as to the centers of the main images.  The absolute last thing I did was tie a little bow using some wrinkled ribbon.  This is the part where my son and daughter-in-law helped me choose between aqua mist ribbon or vintage cream ribbon.  Vintage Cream won out in the end.  I'm not sure if this is the best card ever made, but it sure was the best card I have made in a while.  Thanks for sticking with me on this very long post!

Friday, August 26, 2011

Houndstooth Baby Girl Card


Today I made a baby card at my husband's request.  Yes, I said it.  At my husbands request.  He has only asked me one other time to make a card, so I was pretty excited this time, and this one was a baby card!  I sent him back and forth a few times to find out the sex of the baby and when he needed the card for the office shower, but once I got the info I needed, I knew exactly which set I wanted to use.  I just got the Houndstooth background stamp from Papertrey Ink and thought it would make an adorable baby card stamped in pink.  I have the elephant Click Simple template converted to a file I can resize on my cricut, so I resized it to fit on a Mat Stack #1 diecut.  I also got to use a Layerz Mat Stack diecut to make a beautiful pink and houndstooth focal point layer.  Also used on this card was a cuttlebug swiss dot embossing folder, a double ended banner a sentiment from Baby Button Bits and some pearls for the elephants eyes and cascading out of her trunk.  I love the little elephant ear stamped with the houndstooth pattern.  I only hope my husband doesn't lose this before the shower next week.  I wouldn't put it past him to run out to Hallmark and replace it with something store bought!

Thursday, August 25, 2011

Papertrey Ink August Blog Hop

                                                     Isn't this a gorgeous inspiration photo?

Today I have made a card for the August Papertrey Ink Blog Hop and this pretty photo is to be our inspiration.  With so much to see in this photo if you really look closely, choosing what parts of it to use for my card was tough.  I finally settled on my love of the colors and patterns of the dress in the photo along with the bookprint and color red.  Here is my card:

If you look very closely at the inspiration photo, you will see that the girl in the picture is wearing a gingham dress which has what look to be embroidered white flowers along the bottom of the dress.  To get this effect, I used blueberry sky cardstock stamped with an IO CAC Roses background stamp to create the subtle white flower background using fresh snow ink.  I stamped a gingham background using some A Muse ink (blueberry) and cut both it and a layer of bookprint using Papertrey Ink's Edger Die #3, overlapping them slightly.  I cut a frame from the gingham layer using a Fillable Frame and one of my most favorite sentiments from Think Big Favorites # 3 in pure poppy ink.  I wrapped some red/white twine around the layers before I adhered them to the cardstock base.  Now, for no other reason than I wanted to try making one, I added a red flower made with the new Papertrey ink Bloom Builder #3 die.  I love how that red flower really pops against the blue gingham background.  This was a quick and easy card to make, hope you enjoy the blog hop!

Wednesday, August 24, 2011

One Last Card for WMSC#61

I hadn't planned to make three cards for this weeks Waltzingmouse sketch challenge, but today I had an idea.  How many times have you said that?  Here is the sketch that I ended up loving so much I couldn't stop using it: 
And here is my card:

Halloween Party
I used Waltzingmouse Halloween Party again for this one.  Such a great set with so many uses other than just a party invitation set.  To make this card I first stamped some Waltzingmouse     Text-It gothic style text using smokey shadow ink onto some spider web patterned paper I have had since last Halloween.  The gray ink gave a very subtle texture to the patterned paper.  I used orange ink with one of the sentiment stamps to create a background for the circle focal point.  I then stamped the witch silhouette in black right on top.  I love how it turned out.  I layered that over a lavender circle and a black pinked circle.  The polka dot paper and orange rick rack diecut is from last years stash.  I added a few bats and also a double ended banner stamped with a sentiment and some images from Halloween Party.  This is one of my favorite Waltzingmouse cards so far.  I plan to give it to my little niece who is going to be a witch for this Halloween.  Thanks for taking a look!

Monday, August 22, 2011

WMSC #61- This one is for me

Today I did something I never do.  I made something for me.  No one else, just for me.  I have had a pretty bad couple of weeks. 
Here's the sketch by Sara Martina Parker.


Here is what I made:

 My mom is in the early phases of dementia.  It hasn't been that bad so far, my dad has been the one who has dealt with it on a daily basis.  Two weeks ago, my dad had a mini stroke.  Again, wasn't too serious, he was home quickly but had to have some surgery a few days later.  After the surgery, he has totally changed.  He can't do everything he used to, but it is not 100% permanent.  He could recover completely.  Thing is, his spirit is broken.  He has given up.  No amount of rational explanation has sunk in and he is so sad and depressed.  He's treating each day as if he is going to drop dead the next.  Giving away all of his things, paying future bills way too early, just not acting like my dad used to. 
I have had this heavy blanket of sadness hanging over me lately and I decided that I needed a little pep talk myself.  This little framed card is going to sit on my desk at work.  I love this quote by Eleanor Roosevelt.  It is from Waltzingmouse Afternoon Tea Sentiments which I just got a few days ago.
 I can't believe how appropriate this sentiment is for the way I have been feeling.  I have to be strong, especially at a time when my parents can't be.  To make the card I stamped a subtle background on dark chocolate cardstock.  The patterned papers are from Webster's pages, Country Estate.  The colors are so delicate and pretty, especially paper pieced for the cute tea cup.  I did a little stitching on this one, added some pearls to the teacup and adhered a bit of cream colored lace at the bottom.  The flowers are just something I have had in my stash forever.  I hope my dad gets better.  I really do think he will, but no matter what, I will have to be the one who is strong now, something I learned from my dad.

Next post, going to be something a lot more cheerful, promise.

Sunday, August 21, 2011

Sweet As Can Be

It is no secret that all of us cardmakers have way too many stamps and have a hard time using everything that we have.  Today I am sharing a card I made with some dies and stamps I am just getting around to using.  A few months ago I bought the dies for PTI's Sweet As Can Be set and both stamps and dies for Half and Half.  I have had them quite a while now and had only opened and put them away in their CD case.  Finally, I have broken them out and I am so glad that I did.  I made this card in minutes, that was how quick it came together.
Isn't this pretty and almost good enough to eat?
I chose felt colors that looked to me like rainbow sherbet.  The cardstock is melon berry stamped in versamark with IO CAC "Distressed Dots".  I love that I only have to stamp one time and cover the whole card.  I did the same thing with the Half and Half diecut using versamark to stamp IO CAC "Gingham".  The ice cream cone is cut from kraft cardstock and embossed with the SU Square Lattice embossing folder.  I stamped the sentiment in from Half and Half in dark chocolate ink and wrapped some brown/white twine around the diecut.  Originally, I only had the rhinestone sprinkles on the top scoop of ice cream, but my daugher Carly said, "There can never be enough sprinkles!", so rhinestones are EVERYWHERE.  Thanks for taking a look at my Sweet as Can Be card.

Saturday, August 20, 2011

WMSC61-Halloween Party

First, check out this sketch by Sarah Martina Parker! 

I didn't have to even think this one out, I KNEW that it reminded me of a Halloween Moon with something spooky in silhouette. 


 I used Waltzingmouse's Halloween Party stamp set for this card. 

It has so many great images that would look really scary in front of a bright orange moon and I finally settled on this owl.  I masked off the tree branch the owl is sitting on and embossed it in black to really pop against the orange.  All of the patterned paper is from a really inexpensive paper pack I got at Target last year for $1.  I sure got my money's worth on that purchase.  I stamped a partial sentiment from Halloween Party and centered it right above the owl.  I added a little pinked half circle behind the moon to make it stand out a bit.  I die cut the picket fence and coated it in black Martha Stewart glitter.  I love the way the glitter adds texture to the fence.  I added some ribbon looped over scortape at the bottom and zig zag stitched all around the perimeter.  The final touch was to add a bit more purple, so I stamped the pumpkin and bat and popped them up with dimensionals.  So, what do you think of my take on this sketch?

Friday, August 19, 2011

You're Lovely at 50


One of my co-workers is celebrating one of those dreaded milestone birthdays next week and she is very stylish, very trendy and I knew that the Waltzingmouse Stamps You're Lovely set would make the perfect birthday card for her. 

The beautiful dress form stamp can be used to make almost any style of outfit dependent on the patterned paper you use to piece it with.  I went black and white with some raspberry fizz highlights on this one and I love how it turned out.  I used some black and white papers I have had forever and added a few little sparklies around the waist just to bling it up a bit.  I used IO Cover a Card Screen for the background and also a cuttlebug embossing folder.  So, do you think this would depress someone on their 50th birthday?  Not me if I had that pretty figure!

Thursday, August 18, 2011

Four of a Kind

Edited:  Leigh is the randomly drawn winner of the PTI certificate.  I have sent you a pm requesting your email address for the gift certificate.  Thanks to everyone who looked at our projects.

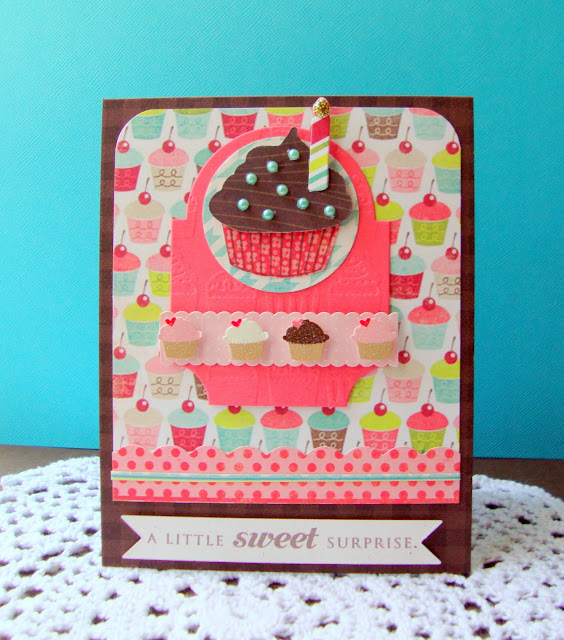
Four of a Kind is a really good thing when you are playing poker.  Four of a Kind is also a really good thing in cardmaking because today, I am sharing a card and links to three other cards made by my three dear Papertrey Ink forum friends, Renee Lynch, Joyce Mehrberg and Kim Heggins.  For the story behind our Four of a Kind challenge, Joyce has the full story on her blog, but in a nutshell,  we all have challenged ourselves to create cards using the same little bag of materials.  We plan to do this for at least four months, each person hosting a challenge and providing the little bag of materials.  The only rule to this challenge is to use at least FOUR items from the kit.  Get it?  FOUR of a kind?  Clever, right?  This month, it was my turn to hostess and here is the little kit we all are using:
Hope you can see all of the little pieces to the kit using Cupcake Collection.  Also in the kit is some patterned paper by My Minds Eye, Lime Twist and lots of little embellishments, twine, diecut cupcakes, embossed cupcake pattern papers, some sentiments and even some little cupcakes and candles. 
Here is the card I made using my kit:

It is amazing how fast a card can come together when you have all of the "ingredients" right at hand.  I used a dark chocolate cardbase stamped with a gingham background and added a layer of the sweet cupcake patterned paper rounded at the top.  I cut a mat stack #3 diecut from the Berry Sorbet cupcake-embossed cardstock and layered a circle of the reverse side of the cupcake patterned paper.  Hard to see in the pic, but the paper is Houndstooth.  Must be very trendy now as Papertrey Ink just released a Houndstooth background set.  I used the little strip of popped up cupcakes for an accent and added my diecut cupcake and pearls as the focal point.  In our kit, there was a double-ended banner stamped with my sentiment and lastly, I added a candle with some gold stickles for the flame.  What do you think?  I used TEN of my ingredients to make this card.

Now it's time for the fun part.  Here is a link to the three other cards my crafty forum friends have created using this very same kit.
I am offering some blog candy in honor of this challenge and all you have to do to win a $10 PTI gift certificate is:
1)  Become a Follower of all four blogs if you aren't already.
2)  Leave a comment on all four blogs telling us how you like our Four of a Kind challenge cards.

I will draw a random winner on Sun, August 21st.  Make sure you check in to see if you were the lucky winner.  Thanks for taking a look today!


Wednesday, August 17, 2011

Waltzingmouse Stamps August Blog Waltz-Tea/Coffee

I'm waltzing today.  Waltzingmouse Stamp Blog Waltzing to be exact.  Today is the August Blog Waltz and the theme is Tea or Coffee.  I had a little bit of a snafu with my Afternoon Tea stamp set.  I was lucky enough to borrow one from a sweet friend who generously sent her set for me to use for this blog waltz.  In the meantime, I found one to buy from another crafty friend.  I sent the first set back, unused as I anticipated the purchased set to arrive any day.  Well, through no fault of the sender, my stamps apparently are circulating all around the United States and have never made it to my home yet.  So, what to do now? 


I downloaded the free ( yes, free!) Tea Bag Baggie template from Waltzingmouse stamps.  Did you know they have lots of things available digitally?  Well, thank goodness for that because I was able to make a really cute little bag that is absolutely perfect to hold some of  my Huckleberry Tea Bags I was planning to give to my Mom for her birthday next weekend.  If you have never had Huckleberry Tea, it is delicious and I brought home several packages of this tea last week from my vacation in Montana.  I had all things Huckleberry while I was there.  Tea, ice cream, honey, and jam just to name a few. 
I realized that the Festive Foliage stamp set from Waltzingmouse has some berry images in it that are absolutely identical to Huckleberries (they look a lot like blueberries).  The leaves aren't exactly right, but close enough.  After I printed and cut out the tea bag baggie template,  I stamped a cute background of berries and leaves.  It was a cinch to fold it up and scortape the edges.  I used a Spellbinder label in Royal Velvet impressed with a vine embossing plate to seal the package closed.  I punched a few holes in the top and threaded some green striped ribbon to secure it.  I added a little embellishment of some leaves and berries that were cut out and a little sentiment, just so my Mom knows what is in the package.  I think it turned out really cute for a spur of the moment project.  Make sure you check out all the digital products that Waltzingmouse Stamps has to offer.  They really were a lifesaver for me.  Hope you enjoy the waltz.

Tuesday, August 16, 2011

Waltzingmouse Sketch Challenge #60

Today I made a card for Waltzingmouse Sketch Challenge #60.  They sure have some great sketches to get your creativity going.  Here is the sketch:
Another good one by Kelly Schirmer.  She sure has the knack for creating interesting sketches.
I used Waltzingmouse Sewing Box Hugs for this one.  The sweet flowers are stamped in versamark on dark chocolate cardstock.  The picture doesn't show it clear enough, but the flowers are stamped in versamark with a gingham background, cut in layers and poped up with dimensionals.  The brown patterned paper is from an old Martha Stewart pack I had lying around and is cut with PTI Edgers #1 with a little bit of twine wrapped around it.  This was a super simple and fast card to complete.   The little sentiment tag is cut with a Martha Stewart punch and stamped with a sentiment from Sewing Box Hugs.  So simple and easy. 

Friday, August 12, 2011

Rescue Remedies Thank You


Just got my Waltzingmouse Rescue Remedy Additions set in the mail and had to break it out right away to make a thank you card for a friend.  I actually used three different Waltzingmouse sets on this card.  I used Text-It  for the background, the Very Vintage Labels  No.4 dotted outline on the peach colored mat and of course, the sentiment is from the Rescue Remedies Additions.  Is that patterned paper not the most beautiful paper you have ever seen?  I can't believe I am describing paper as beautiful, but the Websters Pages, Country Estate paper is absolutely gorgeous.  I got three sheets of 12 x 12 paper and have made two cards so far. I have enough to make several more, and since it is double-sided, there are so many pattern options.  I used a zigzag stitch in brown thread on the Half and Half diecut,  made a doily and added a sparkly and glittered up Prima rose for another peach colored accent.  I am trying very hard to break out of my "only CAS" cardstyle.  Waltzingmouse Stamps are just the perfect stamps to use as I try out a new style of stamping, a little more vintage than what I usually make.  What do you think?

Thursday, August 11, 2011

My PTI Coffee "Date"

Yesterday, I got to do something I had really been looking forward to.  A few months ago I answered a post in the Buy/Sell forum to split the Honey Bees stamp set.  It was a set I had always wanted, didn't need every bit of it, so I was happy to split the set.  That little transaction started such a wonderful friendship, albeit, online.  I finally got to meet the real, live body behind the very sweet and funny online avatar, Rachnsarahsmom, aka, Joyce Mehrberg.
Joyce lives in San Diego and I live in Riverside, close, but not close enough to just pop over and visit each other.  We met somewhat in the middle and spent nearly three hours talking about our families and a very long time about our favorite hobby and obsession, cardmaking and PTI.    Here is a little pic of Joyce and I during our little get-together.
Joyce was such fun to talk to and the time flew by.  She brought me some stamping supplies we had ordered together and also a very delicious little hand-made treat that I admit I broke into before my car left the parking lot.  Here is a pic of what was left of the treat by the time I reached home:


They are the most delicious meringue cookies, and I remember Joyce saying something about them being a Weight Watcher recipe, but I doubt that made any difference as I ate at least 8 of them, hence the small bag in the picture!  She also sent me a beautiful card that she made.  It is so cute I had to share it too:

Isn't this a pretty card?  I hope everyone will take the chance to go check out Joyce's new blog and get the chance to meet a genuinely nice person who shares this cardmaking hobby we all love so much.  Here is a link to Joyce's blog:


Tuesday, August 9, 2011

WaltzingMouse August CASE Comp

There were so many cards during the WaltzingMouse August CASE Comp that I could choose from, but the card I chose to make was by Design Team Member Kate Whelan.  Here is Kate's inspirational card:
I loved how she made that gorgeous background using the Cameo Creations set.  As pretty as individual cameos are, I really love those images to make patterned paper.  There are endless color and image combinations that can be created.   I didn't just CASE Kate's card, I practically copied it because I really didn't change much of her original design. 

 I repeatedly stamped the small male and female cameos in versamark with the little decorative cross shaped image inbetween the cameo sets.  So simple, but also elegant, at least I think so.  For the brown layer, I stamped the little cross shaped image on an angle to form a cute tin-type pattern and then stamped over that with a Text-It stamp.  Wow, I love those text stamps.  They are HUGE!  I only had to stamp one time and didn't have to worry about lining anything up. So easy.  I tied a cute orange bow and added an oval tag for the sentiment from Cameo to Go.  This was such an easy card to make and I know that I will be doing a lot more experimenting with different cameo patterns for future background paper.  Thanks Kate for the inspiration and to WaltzingMouse for creating such a gorgeous and versatile stamp sets.


Monday, August 8, 2011

WMSC59

I am finally home from vacation.  Sixteen days without making a card.  I can't believe I made it and have to admit I did a ton of daydreaming while I was gone.  The first thing I wanted to do when I stormed my craftroom today was make a card for WaltzingMouse Sketch Challenge #59.  Here is the really great sketch by Mischief Maker Kelly Schirmer:
Isn't it a great sketch? 


Right away I got out my WaltzingMouse Eat Cake stamp set.  This set has two sizes of cakes and accessories that are perfect for either weddings or birthdays.  Today's card is for a birthday.  I used some My Minds Eye (Lime Twist) patterned paper and some dark chocolate cardstock.  I stamped the really pretty swag border from Eat Cake and trimmed it out.  The cake is stamped with Versamark onto Simply Chartreuse cardstock and some pure poppy flowers and glitter bling it up a bit.  The Birthday Wishes sentiment is embossed with Fresh Snow ink and of course there had to be at least one birthday candle on my cake.  I used a star rhinestone for the flame and a few little rhinestones on the swag for some sparkle.  Sketch challenges are my favorite type of challenge, and this one was so much fun as I get back into the swing of cardmaking.  Thanks for taking a look.  Make sure to check out the Eat Cake stamp set by WaltzingMouse.  It is really a good one!