

Wednesday, October 31, 2012
Holiday Bundle
Today I have a Christmas card made with a new stamp of mine, Serendipity Stamps Holiday Bundle. It is such a pretty stamp, very detailed and I wanted to make a card showing how easy it is to make a colorful card without having to color.
 I just dabbed some stickles on the holly berries, colored in the bow, cut out the image and layered it on a black mat. It really stands out in red and black. The snowflakes are from PTI (Damask Snowflakes). The cute sentiment label and sentiment are also from Serendipity Stamps (Merry Christmas Casual, small and Panel). I cut a small slit into the label sides and threaded some sparkly black ribbon through it. This is going to be an easy card to mail as it is so flat. Even though I don't like to color, this image also looks beautiful colored. Here's a link to the Serendipity Blog where Holiday Bundle is the 50% off Stamp of the Week and there are several other samples of cards made using Holiday Bundle.
Tuesday, October 30, 2012
WMSC#121 - Wanted, Birthday Girl


Thursday, October 25, 2012
It's That Time of Year Again
All around town I have been seeing pumpkin patches filled with hay bales, scarecrows and pumpkins. This is the time of year when our little horse-town starts to look bright and colorful, such a change from the dry, brown Summer. Today I have made a card that looks a lot like the pumpkin patches I have been seeing.


I used two of my new Serendipity Stamps to make this card, Scarecrow and It's That Time of Year. I paper pieced the shirt with some gingham paper and colored the rest. The fence is a die from My Favorite Things. To make my little hay stalks, I cut up some raffia and tied it with brown twine. I added some pumpkin stickers and a cloud in the sky to create a cute Fall scene. Serendipity Stamps has lots of great stamps, something for every season. Here's a link to the store.
 |
| Scarecrow |
 |
| It's that time of year again! |
Tuesday, October 23, 2012
WMSC#120 -Houndstooth Pumpkin

I've finished up my last Halloween cards and have now moved on to Thanksgiving...I can finally see the end of Summer here in hot, hot, hot California. I haven't had to use our air conditioner for almost a week now which really makes me think of Fall, Autumn colors, pumpkins and Thanksgiving. This week's Waltzingmouse sketch #120 is by Clare Buswell and it is a great one, up for lots of interpretation.
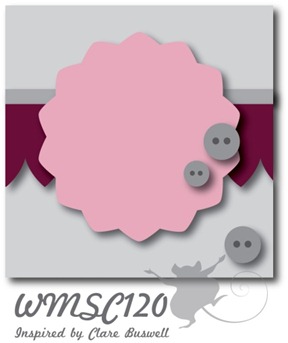
At first I thought of a doily for the center image...thought a little more and wanted to make that round image something a little different and after thinking about it even more...decided to try to make it a pumpkin.

A houndstooth pumpkin! I love, love, love houndstooth and Waltzingmouse has the best houndstooth pattern stamps in Heirloom Patterns, both large and small which are so easy to line up. I used three oval dies to create the orange pumpkin base and four of the same size brown ovals to add the little bit of color separation. I arranged the segments and was able to stamp them so that the lines matched very well once the brown pieces were added. The center piece is popped up with foam tape. The sentiment is from Waltzingmouse Teeny Trees. To represent the little button images in the sketch, I made a few die cut leaves and added a button with a twine bow. I am most excited to have been able to sew a zig zag around this card...I finally have a new sewing machine (my old one broke and only sewed backwards!)
You still have lots of time to make your own card using Clare's great sketch and you might even win a free stamp set! Here's a link for all the details.
Monday, October 22, 2012
Serendipity Stamps Folk Santa
I have been working on this card for several days now. I was so lucky to receive some new Serendipity stamps this week and Mary Lee, the owner is so nice to always send me some extras. In my envelope were two of those unexpected treasures, Folk Santa, large and Folk Santa, small. Their title describes them perfectly. Here is the card I made using the cute stamps:
 Last Christmas I made my son and daughter-in-law a card that included some little tags that they could use on their Christmas packages. My daughter-in-law Katie made such a deal about the little tags that she could use that I decided their Christmas card this season had to include a few tags as well. The patterned paper I used is from Bo Bunny, Mistletoe Collection. I stamped Serendipity Holly Greens Background text onto a sheet of polka dot paper and used it for my base. I edged the top of the card with a Martha Stewart Pine Branch edge punch and added a little bit of burlap since I think burlap adds a "folksy" touch. The focal point is a seed packet from Papertrey Ink. Isn't that a great Santa Claus image (Folk Santa, large)? I paper pieced his coat and colored the rest with copics. You can't see it in my picture, but the fur trim has chunky glitter on it and a little pom pom at the end of his cap.
A glittery snowflake and holly and berry brad add a little more Christmas color. The sentiment is Christmas Memories from Serendipity and is attached using a copic-stained mini clothespin. Now for the tags, the easiest part of the card because they are already made for you, all ready to cut out and tie a bit of twine around them.
They are also from Serendipity and are called Holiday Tags Set.
 They are just perfect to tuck into the seed packet. I actually made 10 of these to tuck into the packet for Katie. I also finished the inside of this card:
 The sentiment is Warmest Wishes by Serendipity and I also stamped the miniature version of Santa (Folk Santa, small) just to follow through with the Santa theme (also, love I just love to stamp this cute image). He even looks good uncolored! Make sure to pop over to the Serendipity store, there's a great sale going on. Just use the coupon code 40FROMHIGH or 40FROM1012 and receive 40% off the highest priced item in your cart. The sale is good through October 24th.

A glittery snowflake and holly and berry brad add a little more Christmas color. The sentiment is Christmas Memories from Serendipity and is attached using a copic-stained mini clothespin. Now for the tags, the easiest part of the card because they are already made for you, all ready to cut out and tie a bit of twine around them.
They are also from Serendipity and are called Holiday Tags Set.


 |
| Holiday Tag Set |
 |
| Christmas Memories |
 |
| Holly Greens Background |
 |
| Warmest Wishes |
 |
| Folk Santa, large |
 |
| Folk Santa, small |
Sunday, October 21, 2012
4 of a Kind October with Kim
Here we are, already mid-October, our California weather has finally cooled down a little and time for another Four of a Kind post. This month our hostess was Kim of Cupcakes, Cards and Kim. She did a fabulous job creating a very spooky kit for us, all kinds of great elements just perfect for creating some scary Halloween cards. Here is a picture of the kit Kim sent to us:

So many fun things to play with, which is exactly what I did while I was on vacation. I made all three of my cards using only elements Kim sent me and they all practically put themselves together...as Joyce would say.
My first card uses Authentique "Enchanted" patterned paper and Waltzingmouse Halloween Party for the great witch "Wanda".

I also used some new Lil Inker dies with a great stitched border impression. The spider web is from Papertrey Ink.
My second card uses some die cut banners and a medallion from Waltzingmouse Wanda's Pantry. The little border is from Papertrey Ink, Loop de Loop.

My last card is my favorite because it is so Halloween "girly".

Here's a pic of all three of my cards, they are already addressed and sent off in the mail or wrapped up waiting for Carly to open on her birthday. Thanks Kim for a fabulous kit this month.
Ready to see what my other three friends have made using Kim's kit? Follow the links below, you will love what you see!
Wednesday, October 17, 2012
Waltzingmouse October Blog Party
This is my second post for today, for the Serendipity Stamps Thanksgiving Invite blog hop, please scroll down.


Here's my card:

Serendipity Stamps Thanksgiving Invitation

This week's special at Serendipity Stamps is a coupon for 40% off the highest priced item in your cart. Just use the coupon code 40FROMHIGH to receive your discount, good through 10/24/12.
Who's hosting the Thanksgiving dinner in your family? If it's you, I know you will want to check out todays projects posted by the Serendipity Stamps Design Team because it is all about Thanksgiving dinner. You are going to see invitations, place cards, napkin rings...all the cute and crafty touches that will make your Thanksgiving table one your family will really remember.
Before I show you my projects, here is the little history of recent Thanksgivings in the Weber family. I have cooked Thanksgiving dinner for our extended family of about 25 people every single year for at least the past 15 years. For a variety of reasons, (mostly because of all the work involved) once it became too much for my mom to do, if we wanted to have a big dinner, it was me that was going to have to cook it. I have made many, many invitations and place cards throughout the years, but wouldn't you know it, the one year I have an assignment to share an invitation...my niece and nephew have decided they would like to cook the dinner in their new home. Great news for me, no cooking, but it also means no invitation to make this year. Instead, I made a Thanksgiving card which could easily have the invitation details printed inside should you want to add them. Enough talking, here's what I made:

I made a card and a pillow box favor to match.

(Be Thankful). The card front is edged with a Martha Stewart punch and the front is popped up with dimensional foam. Those of you that know me will notice that I tied a bow...I know! Me. Tying a bow! I even added a few punched pine branches and a rose, something I very rarely do, but thought it really added to the elegance of those beautiful quail.

Another idea would be to open one end and use it to hold the silverware for each place setting.

***Don't forget about the 40% off coupon code (40FROMHIGH) that applies to the highest priced item in your cart good through 10/24/12***
Ready to see more ideas for your Thanksgiving dinner? Here's the list of my very talented Design Team friends. I am sure you are going to see lots of great projects made with Serendipity Stamps that will make your Thanksgiving dinner one you will never forget.


Sunday, October 14, 2012
Waltzingmouse Sketch Challenge #119 : Tea Time Treats

 Cute sketch, don't you think? This week's Waltzingmouse Sketch #119 by Becca Feeken was quite a challenge for me as I am away from home and only have 3 Waltzingmouse stamp sets with me. With all the images in each set, you would think I could come up with a card using this sketch...but it was tough! I had a hard time thinking what to use for those circle images. I admit I took a lot of liberties with this one, and instead of a card, I made a tag.
Wednesday, October 10, 2012
Summer Barn & Windmill

I spent a very fun day yesterday using some new Serendipity stamps I received the day before we left. I love the cozy feel of the Summer Barn and Windmill stamp. It creates such a warm, comforting feel and is such a detailed stamp, just perfect for stamping without having to color it. Here is the card I made with it:


Tuesday, October 9, 2012
Coud 9 October Blog Hop

Today I have made a card for Cloud 9's October Blog Hop using stamps from WPlus9. This month the inspiration picture is perfect for a birthday card for my daughter whose birthday is on Halloween. Here the inspiration picture:

Here's my card:

I used my Impression Obsession tree die and used some polka dot paper like the tableclothes in the inspiration photo for a rolling hillside. I added those cute Pretty Patches Pumpkins and added a couple of black pearls since several of the pumpkins in the photo had black polka dots. The background was impressed with a Darice striped embossing folder and since I didn't have a large enough raven...changed him into a bat instead which works very well for a Halloween Birthday. For the sentiment, I used one of my favorites from WPlus9 Fresh Picked. You have to "pick" pumpkins, right? My two sons always need a last minute card for their sister and I am glad that I will have one ready when they ask. You have lots of time to make a card and play along with the Cloud 9 Blog Hop...here's a link for the details.
Wednesday, October 3, 2012
Serendipity Stamps Scor-Pal Project Blog Hop

**There is a great sale going on at Serendipity Stamps...FREE SHIPPING on all US orders over $10. The sale runs from October 3-10th so make sure to take advantage of it!
It is finally October and the Summer is officially over. I am so excited to be able to put out some Fall and Halloween decorations around my house. Today the Serendipity Design Team was challenged to make a Christmas project using any one of the many projects on the Scor-Pal website. I use my Scor-Pal every single day, couldn't do without it so it wasn't hard to find a project. Here's a link to the tutorial I chose to make. The tutorial was done back in 2008 by Nancy Morgan and I decided to give it a little 2012 update. I have a ton of photos today so I am going to let the pictures speak for themselves.
There is a little give-away up for grabs if you make it all the way to the bottom!

 |
| Use a Stampamajig to line up image on your page |
 |
| Use mask to show portion of stamp you want and then remove plastic stampamajig plastic guide |
 |
| Stamp through the mask |
 |
| Repeat and color |
Here is the patterned paper all stamped and colored

Just follow the instructions on the tutorial link above to assemble your bag. Here's a view, inside and out, all ready to decorate!

Now for the tealights. They are so easy, and I mean EASY! I used the same masking technique I used to make the patterned paper.
 |
| Stamp image on white tissue paper and color with copics |
 |
| Punch out the image |
 |
| Poke a hole in the center for the wick, lay onto a white tealight and heat for just a few seconds with your heat embossing tool |
You will know when to stop heating as the image gets very shiny, just like when you heat up embossing powders.

Here's the cute little tag I made to go on the top of the bag using one of the Christmas Tag Cling Set Tags. I embossed it with red glitter embossing powder and added some bells, holly leaves and a red rhinestone berry.

The completed bag has a Martha Stewart Pine Needle Edge Punch and the entire Snow Man with Watering Can image stamped and colored with copics behind a Madison Grand Window Die. The cute holiday light swag is from Cheery Lynn (Christmas Light Swag).
Whew! That was a lot talk and I hope I didn't bore you or insult you with my many step by step details.


Are you ready to bring our your scor-pal and create something? Before you do, you will want to visit the blogs of the other Serendipity Design Team members. Make sure to leave a comment on them all, because Mary Lee, the owner of Serendipity Stamps is going to give away a scor-it-board to one lucky winner. Have fun!
Subscribe to:
Posts (Atom)