Pages

Sunday, April 29, 2012

12 Kits of Christmas-April Edition

It's time for our April edition of the 12 Kits of Christmas club and this month has been fantastic!  Marybeth of  Marybeth's Time for Paper is our hostess this month and she went all out and sent us a fabulous package of stamped images, diecuts and patterned papers to work with. 
Here is the kit she sent us:
Photo courtesy of Kara
My cards were so easy to put together with all the elements just sitting there at my fingertips.  First up, a card that relies on the big beautiful sentiment as the focal point:
I just cut the touching sentiment out in an oval shape, embossed it with a linen and canvas impression plate and framed it with a Cheery Lynn Japanese oval diecut.  This frame is huge and is so intricate, there isn't much else that is needed to make a card that just pops out at you.  I did add one of the beautiful gold stars that Marybeth included in our kit.  My poor photography actually paid off for me as the star is reflecting a really pretty glow, just like I imagine a real star would if we could see one up close.
My second card focuses on one of the great diecuts that Marybeth included in our set.
The diecut is by Memory Box and is called Country Landscape.  It tells a story all on its own, and I just added a sentiment banner and some of the glittery trim that Marybeth sent us.  Can you tell I loved that plaid pattern paper and those gold stars? 
Last up is my favorite and, big surprise...I used my Madison Grand Window die.  I have used this die on at least one card almost every single week since I got it.
I love the beautiful and elegant paper Marybeth sent us and that cute image of those little angels walking in the snow.  I did a little coloring with copics and if you could see the card in person, the little furry caps are covered with white flock.  I used the Memory Box holly vine as an embellishment on the window along with one of the sentiments Marybeth sent us.  I cut up a few of the holly leaves and added them to the sentiment and a few rhinestones colored with copics for the berries. 


This was a great month and I am especially proud of myself for also finishing the inside of all three of these cards, even the stamped sentiment.  I am going to be so ready for Christmas next year!  Thank you Marybeth for a great kit this month.

Ready to see some more great holiday cards?  Make sure to visit all the other talented ladies in our 12 Kits of Christmas group.  You will be dazzled!

                                              Suzanne: thecardyard
Jeanne: AKeptLife

Saturday, April 28, 2012

Trendy Tree Tops Happy Birthday

Today I have my first card made with my new PTI Trendy Tree Top set. 
This card is for my uncle, so I used the most masculine colors I could think of, kraft, smokey shadow, soft stone and rustic cream.   Although I have the stamp set, this card was made using only the matching dies.  I didn't have to stamp anything except the sentiment.  The rolling hills are embossed with a SU square lattice embossing folder and the sentiment is from Think Big Favorites #12.   It is a super easy card to make and a lot of fun to arrange those cute tree tops.  

Wednesday, April 25, 2012

Waltzingmouse Sketch Challenge #94-French Country Greetings

Another great sketch this week for Waltzingmouse Stamps weekly Sketch Challenge #94.  This weeks sketch is by Karin Akesdotter.  Here's the sketch:
I have been loving the recently released Waltzingmouse stamps French Country set and used it again this week. 

The background stamp is a pattern that can be used for so many occasions and this time it is stamped in black on white cardstock with lots of edge distressing.  I also added a layer of the Waltzingmouse Chickenwire border too.  Doesn't it go nicely with the French Country background?  I used a very delicate Papertrey Ink Filagree Lace border diecut to add a frilly touch to this card.  The tag and sentiment is from Waltzingmouse stamps Very Vintage Labels #25 and I just added a touch of red copic coloring to the flower image from French Country.  I added a wrinkled ribbon bow and a pretty sparkly button for some bling.  Now for a confession, all of these stamped images came from my sweet friend Renee Lynch of It's a Patchwork Life.  Renee sent these to me as a part of a card-making kit and luckily, she sent so much I have had tons to play with after our original cards were completed.  I think I still have enough to squeeze out at least two more cards and by then, the stamp set should be arriving at my own door.  

Papertrey Ink April Blog Hop

***edit:  I am stuck on jury duty this week so I won't be able to view all the cards nor comment on the blog hop immediately.  Can you believe the judge would not accept a blog hop as a valid reason to be excused from jury duty?
I am not always crazy about picture inspirations as I usually can't decide what part of the picture to use for my card, but not this month for Papertrey Ink's April Blog Hop.  The picture is gorgeous and I knew IMMEDIATELY what I was going to do.  Here's the inspiration  picture:
All those beautiful rolls of fabric in patterns of raspberry fizz and aqua mist.  They look just like the new Papertrey Ink color Pattern Paper packs.  I wasn't sure my order would arrive in time to make my card, so my good friend Joyce of Cards by the Sea sent me some strips of her paper.    Here is what I made with them:
I cut scallop strips and layered them over a cardbase stamped with the roses from Rosie Posie.  I just received that set and can't believe it took me so long to get it!  Those roses are so much fun to stamp in different sizes and colors.  Do you notice the vintage text paper I used?  I bet you don't know what it says!  I know I sure don't, but I also received a few pieces of this Italian book print from Joyce who just got back from a fabulous family vacation in Italy.  This book print was her only souvineer, so I am very honored she shared some with me.  I stamped the largest rose from Rosie Posie directly onto the print and used a Think Big Favorite #3 sentiment.  A little stitching, a hot pink bow, buttons and twine finish the card.  It turned out exactly how I had pictured it in my head.  Want to see some more card based on the inspiration photo?  Head on over and check out all the beautiful cards over on Nichole Heady's blog for their April Blog Hop.  Here's a link.

Thursday, April 19, 2012

MIM #62- Step It Up Layering

I know!  I am doing a MIM for the first time in...forever!  As soon as I saw Betsy Veldman's great video on step it up layering, I knew I wanted to try this.  Betsy's video seen here, shows a wonderful example using the same stamp sets and basic design to create three increasingly "stepped-up" cards. She made a card with one layer, a second card which was slightly layered and lastly,  a card with lots of layers and elements.
Here is my single layer card:
I used PTI's Friendship Jar and a sentiment from Think Big #7 colored with copic markers.  It is fun to use a stamp set that you haven't used in a while, and I had forgotten how much fun it is to color that great big daisy image.  One layer;  I can't think of a single card I have made in the last year that was only one layer.  It felt almost "naked" when I was done, but I knew my next card could have some paper-piecing and other elements to step it up a bit.
Here is my second card:
Same stamp set, same sentiment, but this one has embossing with a cuttlebug folder on the cardbase, a Cheery Lynn Japanese Lace frame (thanks to my friend Jeanne Jachna) popped up flowers, stickles and the sentiment is stamped on a vellum strip.  I also added a little twine bow around the jar.


Which one do you like the best?  You might be surprised to know that I like the "naked" card the best!
Make sure you check out Betsy's video and all the other stepped up cards on Nichole's blog.  Here's the link.

Wednesday, April 18, 2012

WM Sketch Challenge #93 and WM April Christmas Card Challenge

Wow, that is a big title, isn't it?  Today I made a card for April's Waltzingmouse Christmas card challenge based on this weeks WM Sketch Challenge #93.  This weeks sketch is one by Mischief Maker Karin Akesdotter.  She gave us a really cute sketch to use:
Here's my card:
Our WM Christmas card challenge this month was to use either a bird or a "fabulous forest".  I decided to create my own little Christmas tree forest.  I used  A Cottage Christmas to stamp my own little forest scene which is paper pieced onto some cute patterned paper from the Echo Park, Holly Jolly Christmas paper pack.  I used PTI Tag Sale #4 as the base of my tag and layered on a nestie circle diecut.  I stamped a great circle image from WM Faux Fun Circles and was so excited to see it fits perfectly on the Tag Sale die.  I added a snowflake border, red stitching, tiny red pearls and woodgrain embossing to the kraft cardbase.  The sentiment is from WM Compliments of the Season.  At the last minute, I added some red twine, snowflake brad and a tiny little red pearl to the tag.
If you haven't heard about the Waltzingmouse Christmas Card Challenge, here's a link.  There is a really great prize up for grabs at the end of the year to one lucky person who participates every month.  I am crossing my fingers it is me!

Tuesday, April 17, 2012

Waltzingmouse Blog Party-New Beginnings

It's the 17th of the month and I am very excited to share my card for this month's Waltzingmouse Blog party.  This month's theme is New Beginnings and although I know not a single person who is expecting a baby, I made a baby card...a French Country baby card. 
No pastel pinks for me on this little girl card, I went with a striking red and white.  I love the beautiful pattern in French Country and wouldn't you know it, Renee Lynch of It's a Patchwork Life was the hostess for our Four of a Kind exchange and she sent us this gorgeous red/white pattern.  Here's a link to our other Four of a Kind projects using French Country in case you are wondering what I am talking about!   I  added one of the small roosters stamped within a Join Us leafy circle image.  The red bib is a Spellbinder Label #3.  I added a few of the little flower images and some white stitching using a gel pen.  No little girl onesie would be complete without some pearls, so I added them all over this card. 

The sentiment is from Waltzingmouse Compact Sentiments and I have to admit I altered the stamp a bit.  The original stamp says "Wee" Little Baby.  Although it is a cute sentiment, it's not one I would normally say, so I very carefully cut off the "wee" using a pair of sharp scissors and added the "sweet" sentiment also included in the same set.  Much more like something I would say on a baby card.  It was pretty scary using those scissors on my precious stamps, but I got lucky and it came apart and stamps perfectly.

Now that you have seen my little French Country baby card, here's a link to the Waltzingmouse Blog Party where you are going to see lots of New Beginning cards.  Make sure you check them all out!

Monday, April 16, 2012

Four of a Kind April Edition- French Country


See all those roosters?  That is just a very small sample of my rooster and hen collection.  It started 15 years ago when we bought our house and I found a really pretty valance to hang in the dining room.

Here is the valance that started this "Rooster" madness.

I loved those roosters the minute I saw them.  Once I started collecting, everyone I know gave me something to do with roosters and chickens for every gift-giving occasion there was.  My china cabinet is packed.  We eventually got wood shutters in the dining room and no longer have the valance up, but I couldn't get rid of it and have saved it for quite a few years now. 
Then Waltzingmouse stamps released a stamp set that brought back all those great rooster memories. It's called French Country and there are several rooster images, both small and large.   This month, Renee Lynch is our Four of a Kind hostess and did I scream when I opened up my package.  Inside was just about the  most beautiful stamps, diecuts and patterned papers all from Waltzingmouse French Country.  Check out the kit Renee sent us:
Photo courtesy of Renee Lynch
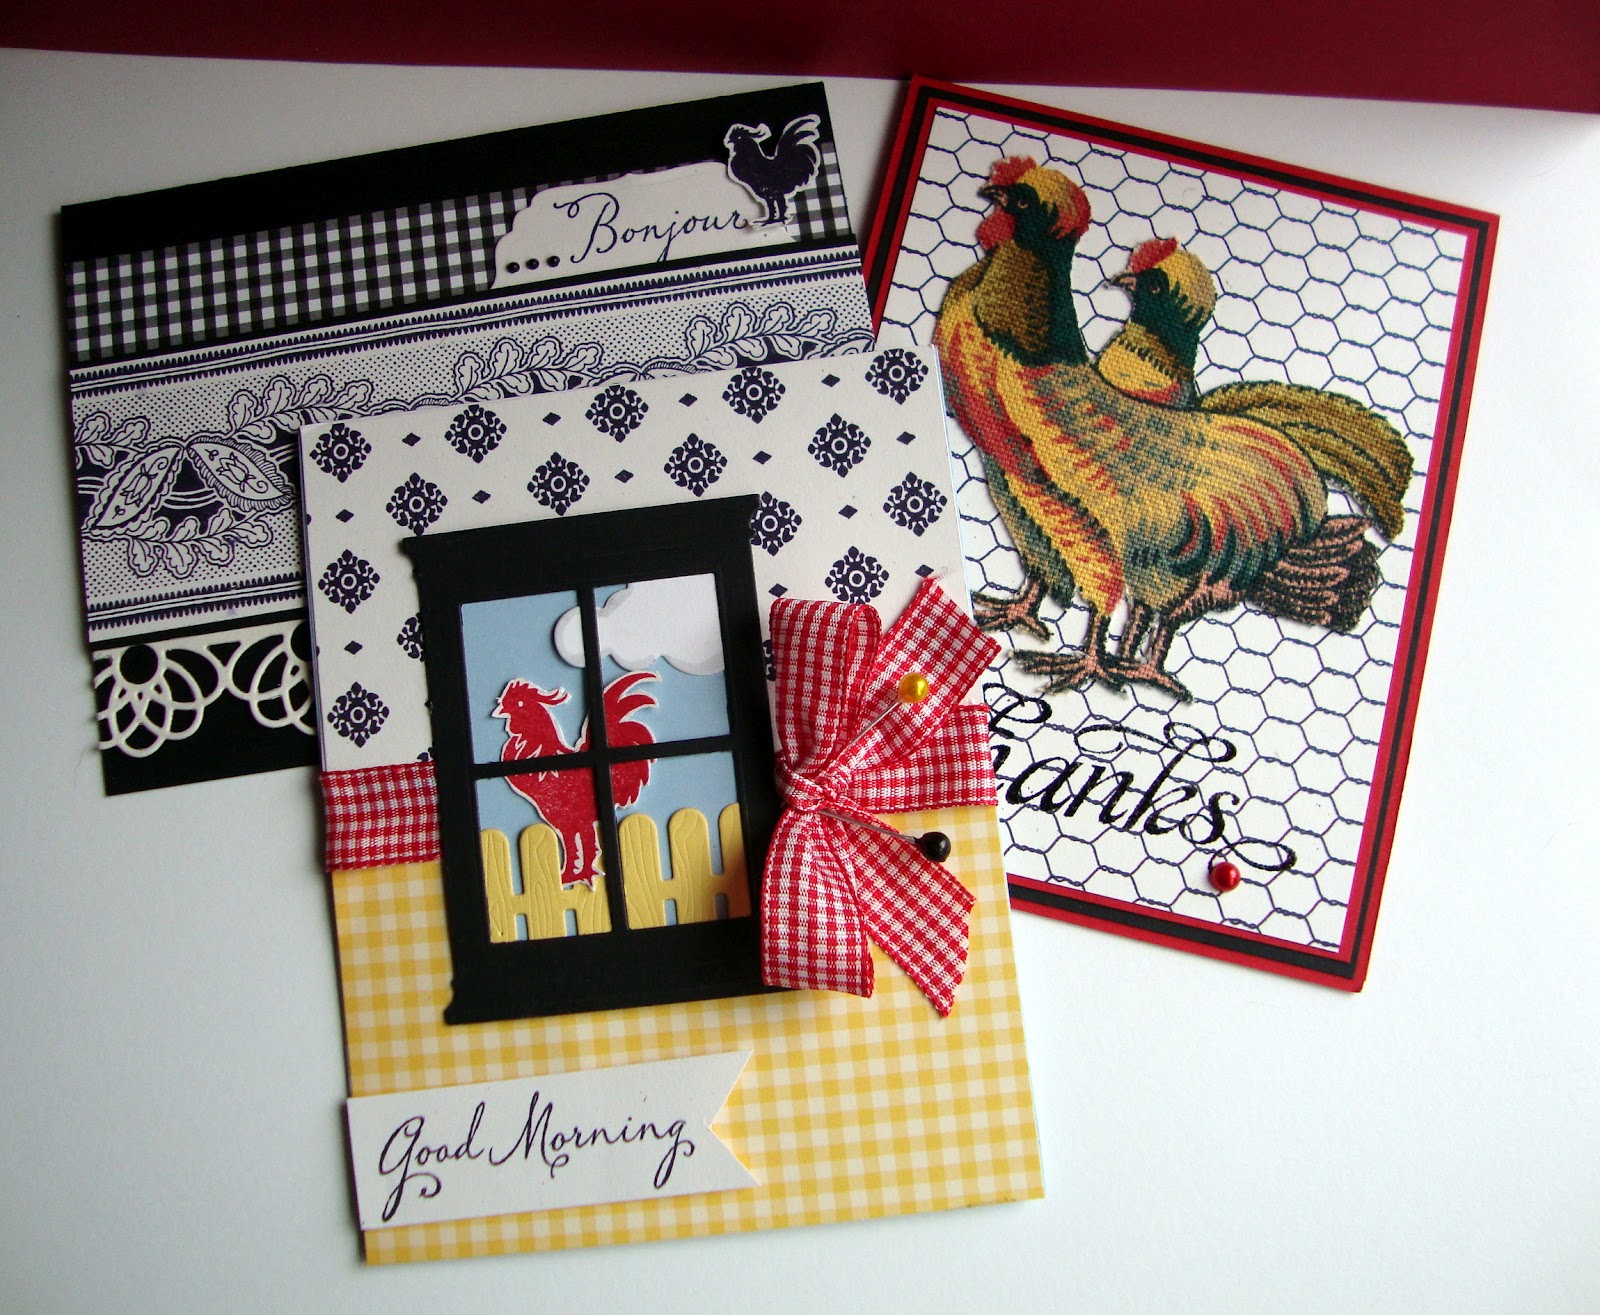
I have been on vacation for a large part of the month, so I only got the chance to make 3 cards for today and one more I will be sharing tomorrow for the Waltzingmouse Blog Party, but I loved working with this stamp set.  Here is my first card:

Can you believe I cut up one of the valance panels that started my collecting craze?  I ironed on some fusable material to add some stiffness to the fabric and carfully cut it out with some very sharp scissors.  I used a glue stick to adhere it to the chickenwire stamped panel and embossed the Thanks sentiment in black embossing powder.  In person, the woven texture of the roosters is really pretty.
My second card uses some of the really pretty patterned paper Renee included in our kit.

Don't you love that background pattern stamp?  It looks so nice stamped in the black ink and when you add the yellow gingham paper, so country-looking.  I added the red/white gingham ribbon that our package was tied up with and you didn't think I could make a 4 of a Kind project without using one of the window dies, did you?  I perched my red rooster on a yellow fence and added a little cloud lined with a gray copic marker. It really makes it pop against the blue background. I added a couple of the stick pins that Renee sent and used the sweet Good Morning sentiment.  I can totally picture a rooster crowing outside a country window. 
My last card is my favorite.
This card uses the extra large border stamp in French Country.  Renee sent us both a black and a red image.  I layered the black image onto a black border and some black/white gingham paper.  I added a filagree border diecut on the bottom.  I think that particular border adds a really elegant look to my card.  The sentiment is stamped on a Spellbinder Label and the small rooster is cut out and popped up on the label.  Told you I loved roosters.
Here's all my cards together:
I loved this month's kit, Renee could not have picked a better stamp set for us to use.  I had a great time using Waltzingmouse French Country.
Make sure you check out Renee, Joyce and Kim's blog to see what they did with our April Kit.