Pages

Saturday, November 12, 2011

A Cottage Christmas Wine Tag-CFC#28


CFC#28


I have had the best time...and the worst time making this winetag for CAS-ual Fridays CFC#28 Tag, You're It Challenge.   First, an explanation of the worst.  I had such a hard time coloring this image how I envisioned it in my mind.  It is so detailed and I had a terrible time shading it so it didn't look blotchy.  I need a lot more practice for this one.  I didn't give up because I thought this image is so gorgeous and just the perfect size to use on a winetag for a Christmas gift.  The second time I just stamped it twice on blue cardstock and embossed it with white.  I added just a little bit of shading with some blue copics and them added lots of prisma glitter.  Everything is better with glitter, don't you think?
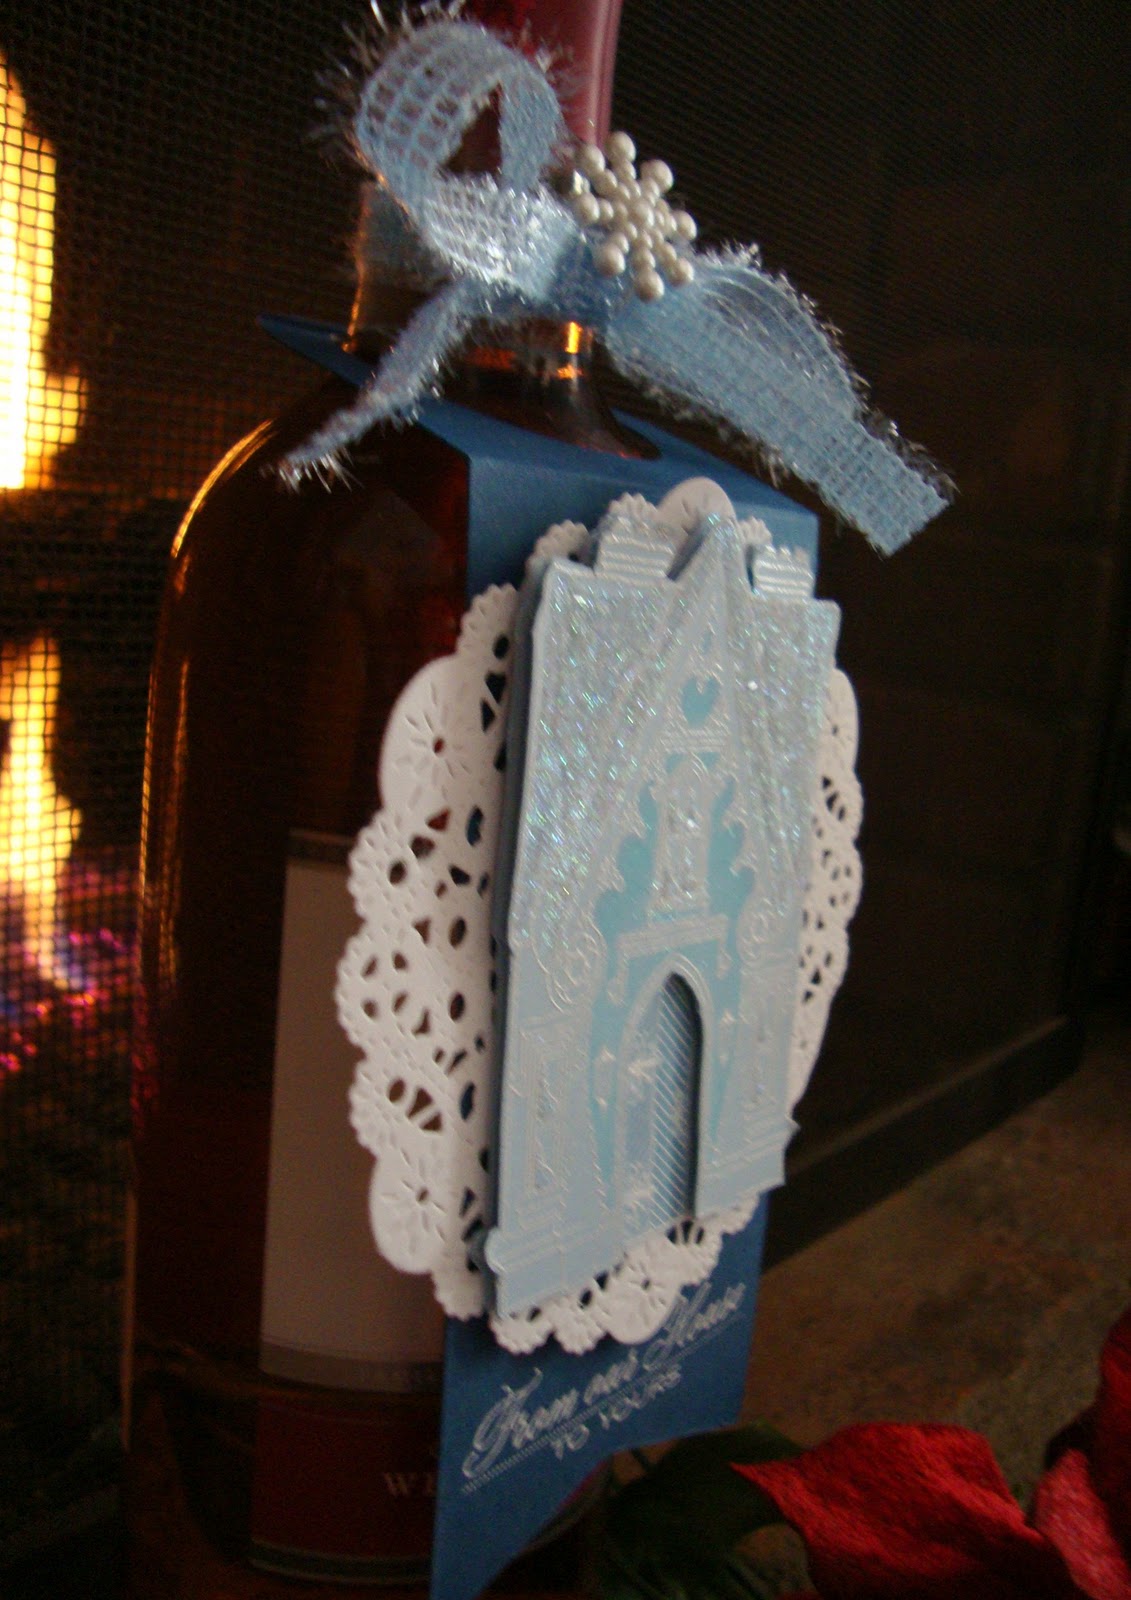
 I cut a white doily and embossed the sentiment from Waltzingmouse Stamps  A Cottage Christmas in white.  I added a bow and a snowflake button and it was done.  Then I started up our fireplace for the first time this year and suddenly, our house felt like Christmas!  I am going to make a lot of these tags to have on hand when I need just a little something to make a bottle of wine, champagne or even sparkling cider look like a special gift.

Tuesday, November 8, 2011

WMSC#72-Big Blooms Poinsettia

Today I have made a card for Waltzingmouse Stamps Sketch Challenge #72

This week's card is a tri-fold and I got my inspiration from one of the Waltzingmouse Mischief Makers, Iwona Palamountain's beautiful card.  To see her card, click here.  Iwona's card  had gorgeous diecut edges on the outside panels.  I knew I wanted to do something similar with my card and decided to use my Papertrey Ink edger dies.  Here is the card I created:


I used patterned papers by Simple Stories 25 Days of Christmas and I stitched around the curved edges for added texture.  My favorite part of the card is the belly band.

Here is a pic of the inside of the card and the belly band:

 I stamped a medium sized poinsettia from Waltzingmouse Stamps Big Blooms Poinsettia onto scarlet jewel cardstock and embossed it in black.  I didn't have to color it at all, the embossing brings out every detail.  The belly band is made from some corrugated cardstock and reminds me of the band that comes around my favorite Starbuck coffee.  I stamped the poinsettia 3 times and cut it out and popped up the layers using gold glass beads for the flower center.  The inside sentiment is from Waltzingmouse stamps Compliments of the Season.  I am definitely going to try this type of card again using different dies to cut the curves.

Monday, November 7, 2011

Waltzingmouse November CASE Competition

Today I have two little projects, both cased from Clare Buswell.  Here are links to Clare's projects.  The first was a candle and the second was a gorgeous card.  Clare's candle used Seasonal Remedies, a stamp set that I don't own, but I do have the new Nordic Winter set and made my candle using that set.  The card also uses Nordic Winter and Say It Loud Winter Holiday along with a diecut reindeer. 
I think Nordic Winter is my very favorite Waltingmouse stamp set so far.  It looks so striking stamped in red on cream.  Thanks Clare for the holiday inspiration!

Wednesday, November 2, 2011

WMSC#71-Poinsettia Buttons

I love poinsettias.  I love their deep red color, their delicate shape, pretty much everything about them.  Today's WMSC#71 card features poinsettia buttons.  Here's the sketch by Kelly Schirmer on which my card is based: 


Here is my card:

This is a 5 1/2" square card and the base is a beautiful deep green pinefeather cardstock from PTI.  I made my own patterned paper by stamping a sentiment and icicle image from Waltzingmouse stamps Compliments of the Season alternately in green and red ink.  It makes a really pretty combination and I dotted some stickles in the center of each little snowflake.  The main image is a button card from Papertrey Ink's Button Boutique.  I made my own buttons using Waltzingmouse stamps Big Blooms Poinsettia stamps.  Two of the buttons are covered with diamond glaze and really do resemble buttons you might purchase.  The button card is layered over a Spellbinder fleur de lis square frame and snowflake-impressed Spellbinder square diecut.  I zigzag stitched around the perimeter and tied a pretty gingham bow and cinched it in at the center with a "real" poinsettia button.  I think I will send this to one of my crafty friends this Christmas, who better to appreciate buttons than another crafter?  Thanks for taking a look.

Monday, October 31, 2011

WMSC#71 "Paper Ruffles"

Today I am sharing a card I made for Waltzingmouse Stamps Sketch Challenge #71 which features a sketch by Kelly Schirmer.  I have been wanting to try out a technique for making paper ruffles that I first saw on a sketch challenge inspiration card made by Clare Buswell.  She kindly posted a tutorial on how to make the ruffles.  If you would like to check it out, here's the link.  I have to admit my ruffles did not turn out as soft and poofy as Clare's, but after quite a few tries, these were finally good enough to actually use on a card.  So, I waited for quite a few weeks until a sketch came along that I could envision using these ruffles.  Today's sketch has that cute little element that could be ribbon, but, I saw ruffles.  Two of them.  Here is my card:
These ruffles were made from some double-sided paper given to me by my friend Renee Lynch.  She kindly sent me two giant boxes of patterned paper and this is the first opportunity I have had to use some of it.  The cardbase is PTI Autumn Rose and the frame stamp set is from Waltzingmouse Stamps Vintage labels #18 and the sentiment is from Say it Loud.  I stitched around the edges and used lots of tea dye to distress all the edges along with a little strip of lace along the top edge of the ruffle.  I added some pearl flourishes and a glittery flower as accents.  This is definitely a  "hand-it" to you kind of card as it would be pretty bulky for mailing.

Saturday, October 29, 2011

CR84FN41-Sailboat


My sweet little nephew turns one next weekend and I have been wanting to make a shaped card for him, but couldn't make up my mind what "shape" it should be.  I discovered the Cutting Cafe the other day, a great place to buy svg files to cut on my cricut and there I found this sailboat.  I decided to use the colors from this weeks CR84FN41 which were perfect for a little boys card, steel blue, gray and yellow.  I  only recently discovered CR84FN and their color challenges and I am really enjoying the beautiful color combinations they use in their challenges.   Here's my little sailboat:
After I diecut the sailboat shapes on my cricut, I stamped patterns from Waltzingmouse stamps Off Beat Backgrounds and Pic-nic Patterns.  Both of these stamp sets are so great to create your own patterned papers.  I had a blast stamping that plaid background in all three of the colors.  There are so many different combinations you can create.  I added a little Spellbinder ribbon banner with Grant's name on it, thank goodness he has a short name!  I would like to give a special thanks to my sweet friend Jeanne Jachna of A Kept Life who was so sweet to send me these dies, for no other reason than she is a super generous person!  I have wanted them for some time and they aren't available at my LSS.  Thanks so much, Jeanne.  The last touch on this little card was a tiny ribbon flag and button.  Super quick and easy card for a very sweet little boy on his first birthday.

Wednesday, October 26, 2011

WMSC#70: Irish Santa?


Today I made a card for Waltzingmouse Sketch Challenge #70 which uses a sketch by Kelly Schirmer. 

                                                                            Here's my card:


This card was so much fun to make and I used several  Waltzingmouse stamp sets I just received, Around Christmastime and Off Beat Backgrounds.  One of the things I love about Waltzingmouse stamps is they are so great for making patterned paper.  The stamps are huge, so easy to line up and it took me no time at all to stamp the black and white checkerboard pattern on this card.  I used A Muse pigment ink in onyx and I was so happy with the result.  The other thing I love about Waltzingmouse stamps is their images are so intricate, they don't need a lot of detailed shading when you color them.  For my "Irish" Santa, I stamped the image with the onyx ink and clear embossed it.  I colored Santa's hat green, I know, not the traditional color of Santa's hat, but I was trying to tie in the green cardbase.  Who says Santa can't wear a green hat?  Not me!  I added some tinsel glitter to his hat and colored the bell with a gold glitter pen.  Between the embossing and the glitter, he is pretty darn sparkly.  The Santa image was diecut with a Spellbinder pinked circle popped up on a slightly larger circle diecut.   I distressed the edges of the patterned paper and added some saddle stitch ribbon and bow.  There are two pine sprigs which are images from Around Christmastime.  They are embossed, hand-cut and all glittered up too.  The final touch was the two little jingle bells tied on with twine.  So far, this is my very favorite holiday card.  I think I will be making several of these to send this year.  Thanks for taking a look.