Pages

Monday, December 31, 2012

Winter, Through the Window

**Serendipity has a new Challenge Blog...this week's theme is Winter Birthday, a great prize of $20 off your next order could get you some beautiful stamps...check it out here**

Last August I made this card using Serendipity Stamps Bare Tree stamp.  Since the season has changed I thought it would be fun to do a series of seasonal window cards using the same image.  Today I have Winter's card...using the exact same layout and image but with colors more appropriate for Winter.
This one only has one tree because I wanted to have enough room to add some lacey, glittery snow to the base.  The die is Border Carnivale by Cheery Lynn.  The glitter is Martha Stewart course glitter.  I picked up the patterned paper yesterday at Michaels.  It's from Recollections and is called Love Amour Amor.  Lots and lots of pretty patterns to choose from.  I used a fiscars border punch and only kept the little hearts that were left after I punched the pattern.  The branch is Martha Stewart Pine Branch and the sentiment is from Serendipity Stamps (Everyday words small, horizontal).  I already have a good idea for my Spring card but no idea what to do with Summer.  Any ideas for me?


Bare Tree
Everyday Words, small horizontal

Sunday, December 30, 2012

12 Kits of Christmas - December with Sharron

Although Christmas is over, today is the 12th posting for our 12 Kits of Christmas club.  This will be my last posting for the group, but next month there are going to be some new surprises happening with the 12 Kits club...I hope you will all look forward to seeing what the group comes up with, I know I will!  This month, however, I have a few of the last Christmas cards I made for 2012 using a beautiful kit sent to us by Sharron of On Papillon Wings.  Wait until you see all the goodies she sent us!
So many great stamped images from Lawn Fawn, PTI, and WPlus9.  Beautiful papers, cute diecuts (loved those mittens and sweaters) and pretty ribbon and bling all packaged up just ready to use.  Here are the three cards I made using Sharron's kit:
This is my favorite of the group.  I have decided that creating scenes is my favorite thing to do with cards.  I had the best time finding pieces of our kit that would work together to create a winter clotheline.  I love the mittens cut from felt and that great sweater die with some extra trim and snowflake added to it.  When I was all done, I decided to add those cute little birds decked out with their sparkly scarves.
My second card is also a little scene, although the base was stamped by Sharron and all I had to do was add some little embellishments to create my In the Meadow snowman scene.
 I pinked the edges, added the broom hats and trees and poked two holes so I could thread twine and tie a scarf for one of the snowmen.  I added some puffed paint to the snowman cap and some red sparklies left over from a previous 12 Kits of Christmas kit.  My daughter gave this one to her boss for Christmas.
 My last card went to my Mom and Dad.  I did a little stitching, and even tried my hand at tying a poofy bow.  I threaded some twine through the lace and added the cute sentiment stamped by Sharron for the tag.
I have had a wonderful time this past year while in the 12 Kits of Christmas club, and can for the first time say I had all my Christmas cards done without the last minute rush I usually have.  Let's hope I can keep it up on my own this next year.  I can not wait to see what the other ladies have done with Sharron's great kit and I look forward to seeing what they do throughout the coming year! 


Saturday, December 29, 2012

2012 Top 12 Favorites

Another year come and gone and I had a lot of fun scanning though my blog yesterday to choose my Top 12 favorites of the year.  I didn't make quite as many cards as the previous year...just a bit under, but still found time to make some cards I really ended up liking.  Here they are:
 
Love those window die cuts


Fun using plaid background stamps
Another window card...loved the cute couch

Loved mixing and matching stamps

Loved the scroll heart and the yellow bow


Loved that the card matched the baby gift


Another window and some fall trees

Made a set of elegant baby cards


Loved the cute images and pinked squares


Love the picture of Carly from years ago
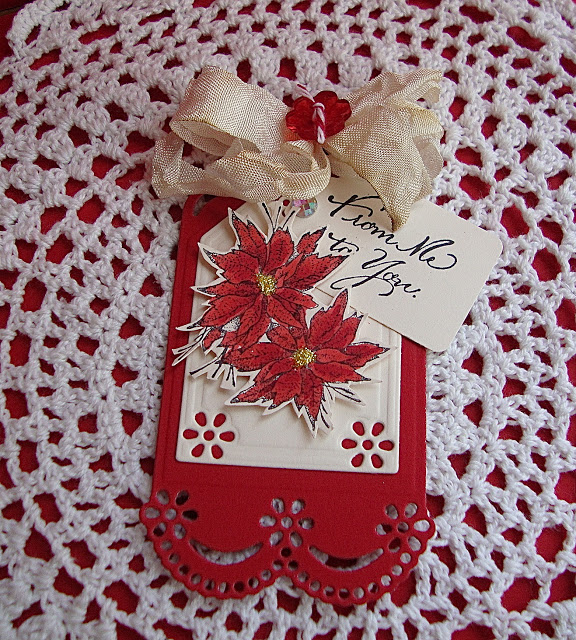
Loved the doily tags and the poinsettias
Labor of Love

What was your favorite?  Mine is the Advent board because it took SO long to make and each one means a little something to me.  I hope it holds up for many years to come.  Thanks for taking a look at my year in review.  Hope to see yours!


Saturday, December 22, 2012

Bogaversary Winner

Just a quick post to say my 3 year Blogaversary winner is Nancy Guse.  I had 14 eligible comments and Nancy was the lucky #13.  Please contact me Nancy and I will get your stamps right out to you!

Tuesday, December 18, 2012

Serendipity Stamps Blog Challenge #2 - Winter Birthday and Blogaversary

***This is my three year blogaversary and I have some blog candy up for grabs.  Details at the bottom of the post***
I am so excited that people are starting to learn about our new Serendipity Stamps Blog Challenge.  We had several people play along with us for SSBC#1 and look forward to seeing even more participate in the coming weeks.  Our challenge this week was extra fun for me as I really needed a card which perfectly fit this week's theme...Winter Birthday.  My husband Warren's birthday is Dec. 29th.  He says it has never bothered him to have a birthday so close to Christmas, but it does seem that each year his special day gets lumped in with Christmas when we see so many of our family.  I can't tell you how many times his gifts have been wrapped in Christmas paper, but this year, I have made a special card for him that is totally HIM.  Here's a picture to set the scene for you:
This was taken in October at our little Montana cabin.  Warren loves all the deer that come up to our porch waiting to be fed...this guy actually ate right out of the bucket Warren was holding.  I was inspired by all the deer in the background and foreground,  as well as the pretty trees and mountains in the distance.  Lucky, I have a Serendipity stamp (Winter Doe) that totally reminds me of this scene, minus Warren and the plaid pj's of course.

Starting with a piece of woodgrain-embossed kraft cardstock, I cut a window frame with my craft knife and matted a green frame behind it.  I layered it over Winter Doe stamped in brown ink.  I added a decorative edge to the kraft panel and layered it over some green plaid paper.  The cute deer are by Memory Box, Deer Trio.  The sentiment is a combination of two Serendipity stamps, Winter, from Spring, Summer, Winter, Autumn set and part of Happy Birthday, Simple.  They were stamped on a PTI die Strawberry Patch and stitched by hand with embroidery floss.  I wrapped a little twine around it all and since it is a Winter card...I had to add at least one snowflake for embellishment.  This is the first card I have made for Warren that I am absolutely certain he will like!

How about some more Winter Birthday inspiration?  The Serendipity Stamps Design Team has created cards perfect for that person in your life who has a birthday this winter.  After you check them all out, I hope you will all join us and make a card for SSBC#2 with the theme Winter Birthday.  You can use anything you want on your card as long as there is one item from Serendipity included.  Don't have any Serendipity Stamps yet?  This week Serendipity is having a great special...40%off the highest item in your cart and it runs from Dec. 19-26th.  Why not spend some time looking through their store.  It is a great way to spend some time with a nice cup of coffee.   The challenge runs for two weeks and the person who knocks our socks off with a spectacular card gets to display the SSBC winner badge, and a randomly-drawn participant wins $20 off their next Serendipity Stamps order.  Looking forward to seeing what you all make!

My three year blogaversary is just a couple of weeks away and I am having a giveaway of some great Serendipity products.  I have had a little sneak peak of the theme for the next six months of Serendipity Blog Challenges and am giving away some stamps and die cuts that will be perfect for someone to play along with every challenge.  Just leave me a comment on this blog post and I will draw a random winner on Dec. 22.  The winner should have their stamps in time for the next challenge!


Winter Doe


Spring  Summer Autumn Winter
Happy Birthday Simple

Coffee with Friends

Just a quick post to share the very fun morning I had today.  I was able to have coffee with two of my best crafting friends...Joyce Mehrberg of Cards by the Sea and Marybeth Lopez of Marybeth's Time for Paper.  This is the second Christmas in a row that I have coffee with Marybeth and Joyce and we have decided it will be a yearly tradition.  You would have thought we had known each other all our lives...so much to laugh and talk about.  I wanted to share with you the gifts I received from my good friends today:
Joyce made...yes, I said made some delicious English Toffee and Marybeth gave us each a gigantic roll of dimensional tape.  Do you see the size of that roll?  11 inches across!  Get ready for a lot of popped up projects.  I had to take my parents Christmas shopping after coffee, so you can bet the minute I dropped them back off at their house I dove into the English Toffee...See's Candy, watch out!  They don't even come close.  Here is a picture of the three of us taken by the poor kid sitting next to us.  We all had cameras so it was three sets of shots.
Such a fun day...it is so nice to spend time with people who love the same things that you do!

Sunday, December 16, 2012

WMSC#128 - Trendy Santa


Ho! Ho! Ho!  I was hoping there would be a sketch this Christmas for the card that was floating around in my head and Yippee!!  Saturday's WMSC#128 by Mischief Maker Kim Duran was perfect for what I have been thinking about.  At Christmas, Santa is always on everyone's mind and I was no exception.  Here is the sketch that inspired my Santa card:
 I made a Tri-fold card with a belly band.  I called him a "Trendy" Santa because he has a plaid background stamped all over his red coat.  Waltzingmouse Cabin Plaid Backgrounder is stamped in Versamark and gives a subtle little texture to his coat.  I did a little stitching and added some buttons which overlap each side of the card.  The sentiment is from Around Christmas Time and when you open the card...
here is what you see.  This image fits perfectly with a Santa card and is also from Around Christmas Time.  In this picture you can see how the buttons overlap on the left side of the card.  I only have a couple more Christmas cards to share before boxing up the Christmas supplies and packing them away until next year.  Make sure to check out this week's cards on the Waltzingmouse Sketch Challenge Blog.

Thursday, December 13, 2012

CASology #23 & CASual Fridays #81: Folk Santa


I had the day off from work today and spent nearly all of it in my craft room.  The best day ever!  I made a clean and simple card using my very favorite holiday stamp of this season, Serendipity Stamps Folk Santa.  I made this card for two challenges, CASology #23 where the cue word is "Gift" and CASual Friday #81 whose requirement was to use a knot on a card.

Nobody knows gifts better than Santa, and I love this folk Santa image holding a stocking and bag of "gifts".  Normally I paper piece Santa's outfit, but today I tried to stay true to CAS and I just colored it with copics.  I used some Marvy Uchida liquid applique to give Santa's trim a puffy look.  To fulfill the CASual Friday requirement of using a knot, I tied three french knots for Santas buttons.  The tag is an elongated version of PTI's Tag Sale #6, traced and when I did, I added a little bit of length to fit the Santa image.  I did add a bit of glitter and couldn't resist a big old bow with another "gift" as an embellishment.  The tag and bow are layered on a piece of cardstock embossed with a striped embossing folder.

I would also like to mention there is a new challenge blog in town.  Serendipity Stamps now has a twice a month challenge blog.  The first challenge is to use an accordion die cut on a card.  It can be any die you want, you just need one Serendipity stamp or die to enter.  A great prize is up for grabs too, $20 off your next Serendipity order. I hope you will all check out the new blog and enter a card...who doesn't want to win free stamps?  Here's a link: Serendipity Stamps Blog Challenge #1


Tuesday, December 11, 2012

WMSC#127 - Xmas Pinwheel


After making a ton of Christmas cards, you would think I would be done by December 11th, nope...still working on the last few I need.  Today I have a card to share for WMSC #127, a very interesting sketch by Teresa Kline a Waltzingmouse Mischief Maker.  Here is the sketch I based my card on today.
When I look at this sketch, my first thought was a tree.  It would have to be a pretty tall tree, so that idea went out the window and I decided to base my design on something with a long, straight stem or handle and a pinwheel popped into my  head.  Lucky for me, Waltzingmouse Stamps has a very fun pinwheel set (Playful Pinwheels) and I decided to make my pinwheel themed for Christmas.  Here's my card:

I always make some cookies for our next door neighbors and thought the sentiment from A Cottage Christmas worked really well with the little house patterned paper from Echo Park Holly Jolly Christmas.  I used some Christmas cord for the pinwheel stick.  After I had this card all done, I realized that I could have stamped my own houndstooth pattern too using Waltzingmouse Heirloom Patterns...next time that is what I will do!  The snowflake border is a Martha Stewart punch and I am just about out of my little snowflake buttons, have to remember to stock up on them before they are gone from Michaels til the next holiday season.  You still have time to make a card for this week's sketch challenge...just follow this link and get to creating!

Tuesday, December 4, 2012

Serendipity Blog Challenge #1

Today is a very special day...a first, actually.  It is the very first day of the brand new Serendipity Stamps Challenge Blog.   I have been using on the Serendipity Stamps Design team for six months and am so excited that we have our very own challenge blog now!   Serendipity Stamps Design Team member Jeanne Jachna of A Kept Life put a ton of work into getting this challenge up and running.  She had some help from the very talented Anya Schrier of Life is What You Make It.  Everyone knows how talented Anya is,  not only designing cards, but also as a graphic designer.  Anya designed all of the graphics for the challenge blog and is also re-joining the Serendipity Design Team beginning in January.  How lucky are we?  We also have another new Design Team member who will be joining us today...Marybeth Lopez of Marybeth's Time for Paper.   Marybeth designs beautiful cards and you can expect to be totally inspired by her beautiful designs.  I hope you will all leave her a little note of congratulations...she will be fabulous! Every two weeks a new challenge will be posted with lots of inspiration ideas from the Serendipity Design Team members.  And prizes.  Did I mention prizes too?  To have a chance to win all you have to do is make a card or other project using at least one Serendipity image or die, link it on the Serendipity Stamps Challenge Blog (where you can also get more details about the challenge) and then cross your fingers.  Not only will there be a best card winner (who receives a special badge to display on their blog) , but a "random" winner too! The "kick-off" prize this week is $20 off your next purchase at Serendipity Stamps.  That is a great prize, especially when you take a look at all the beautiful, detailed stamps and dies in the Serendipity store.

Ready to see what the first challenge is all about?  Honeycomb.  I know, I didn't know what it was either other than something sweet made by bees.  It only took a quick Google search to find out that it is something really interesting and very fun to make.  Here is a link to the tutorial at Splitcoaststampers by Lydia Fieldler that I used to make my honeycomb project.
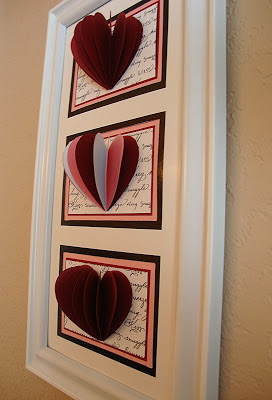
 This 9 x 16 framed honeycomb project is now hanging on my craft room wall.  Every time I see it I smile because the colors are so pretty and it was such fun to make using Serendipity Stamps Heart Outline Die.  I used thin cardstock and cut two hearts at a time.  Eleven hearts for each project.  They are folded in half, glued right end to left end and fanned out like an accordion.  I used a glue stick to glue mine together, left it dry for a while and was all ready to finish my project.
 I stamped three mats using Serendipity Hug Squeeze Background stamp and glued the hearts to it.   I love red, pink and black together.
Are you ready to give it a try with your own honeycomb project?  Need a little more inspiration before you dive in on your own?  You will want to check out the projects made by my talented Design Team friends.  After you do, I know you are going to want to get out your Serendipity dies and stamps and get to creating.  Remember, all it takes is one image or die from Serendipity to participate.  If you don't have any...Serendipity is having a sale this week, a perfect opportunity for you to buy some great stamps so you will be ready to play along with our next challenge on December 19th.

**Free shipping on all US orders of $10 and up and runs from Dec. 5 - Dec 12, 2012.

Now grab yourself a cup of coffee and enjoy the Serendipity Honeycomb Projects:

Monday, December 3, 2012

Snow Bunny

It is getting a lot cooler now that it is officially the month of December, although it never snows here in CA where I live.  That doesn't mean I don't like to pretend I know what it is like to live where snow covers the ground and beautiful trees have light powdery snow covering them, sparkling in the sun.  Although I do have a pretty good imagination, today I used Serendipity Stamps Snow Bunny which is the kind of stamp that doesn't even need an imagination to picture a cute bunny leaving it's tracks around a snow-covered tree.
Isn't that a cute bunny?  I used Serendipity Stamps Snow Bunny for my main image and Merry Christmas for the sentiment.  That stamp is really beautiful embossed in white...very elegant.  I colored the tree with copics and added some Marvy Uchida Liquid Applique to create the puffy snow.  After it was puffed up, I smeared some glue on parts of the snow and added chunky glitter for a bit of sparkle.  I added some lace trim and twine to soften the stark white of the main image panel.  I sure wish I could see something like this as I look out my window, but it is much more likely it would be a gopher running in dry brown dirt rather than a cute bunny in snow.  Not quite the same, is it?  Like I said, I have a good imagination.


Snow Bunny
Merry Christmas


Saturday, December 1, 2012

Countdown to Christmas Display

Today I am posting a project that I have been working on for quite a while.  Two months ago, Nichole Heady posted this project to highlight the Countdown to Christmas stamp sets.  As soon as I saw it I could see into the future and picture my future grandchildren fighting over who got to take off which tag and hang it on the tree.  I could picture hiding little messages and announcing fun things we were going to do together behind each tag.  I pictured this being displayed year after year and hoping this is something my family will look back on and smile when they think of it.  I hope they will laugh when they talk about crazy mom who spent so much time in her little craft room making little bits of colored paper that when assembled, looked so pretty and created great memories.  I ordered Countdown to Christmas that night, bought a great big frame, burlap and chicken wire, tucked it aside planning to make it well before December 1st.  Thanksgiving comes and goes and it dawned on me that I better get going or there will be no Countdown to Christmas this year.  If I didn't make it this year, chances are it would never get made, so I dug in and have worked on practically nothing else until today when this project was completed.  Here is what I ended up with, pretty much identical to Nicholes framed Advent calendar, but with my own individually decorated tags.
The inside portion of the frame measures 20 x 30.  The burlap was adhered using spray glue and the chicken wire was folded over the edges and snipped to the right length.  That was the hardest part of this project and my fingernails still look horrible!  Once I had the frame made, I started making my tags.


Carly liked the hot cocoa tag the best because it had pink on it.


Letter to Santa is my favorite although it didn't take any time at all to complete!


This is my second favorite...velvet paper is so pretty in person.

After making Tag #4, I realized I should just make the rest of the tags and add the numbers when I was done.  That way, I could arrange...and re-arrange them to get the best color, shape and size combination.  I die cut a coasterboard layer for behind the decorated tag so they would be sturdier to last throughout the years.   The clothespins were dyed with wood stain overnight in a zip lock bag.

Now, what am I going to do this year when I have no little kids and no grandchildren that will be able to see the little activity tags that are left once you remove a tag.  My board will look pretty darn bare by the time the last week of December comes around.  I have decided to try (TRY) to take one picture every day of the month, anything that looks cute or fun and has to do with my family.  I will put each picture into a polaroid diecut frame and clip it up in place of the numbered tag.  We'll see if I end up with more than one or two pictures displayed when Christmas Day finally rolls around!

Whew.  That took almost as long to write as it did to make.  Thanks for sticking with me and looking at my Countdown to Christmas Display.

**You will note that many of my tags used Waltzingmouse Stamps...just to let everyone know they now have limited shipping based in the United States!!!Yah for all of us who want to get their stamps super fast!  Spread the word**